Whats New?
New DOKU Account Billing Back Office designed to make better experience for you. Explore all new feature with new interface that pleasing in your eyes.
Better Experience
We changes all the experience from login to report transaction, see more detail information each menu.
Restructure Menu
More simple menu structure, easy to access and right in where you want. The changes like description below, number will be guides from old menu to new menu.
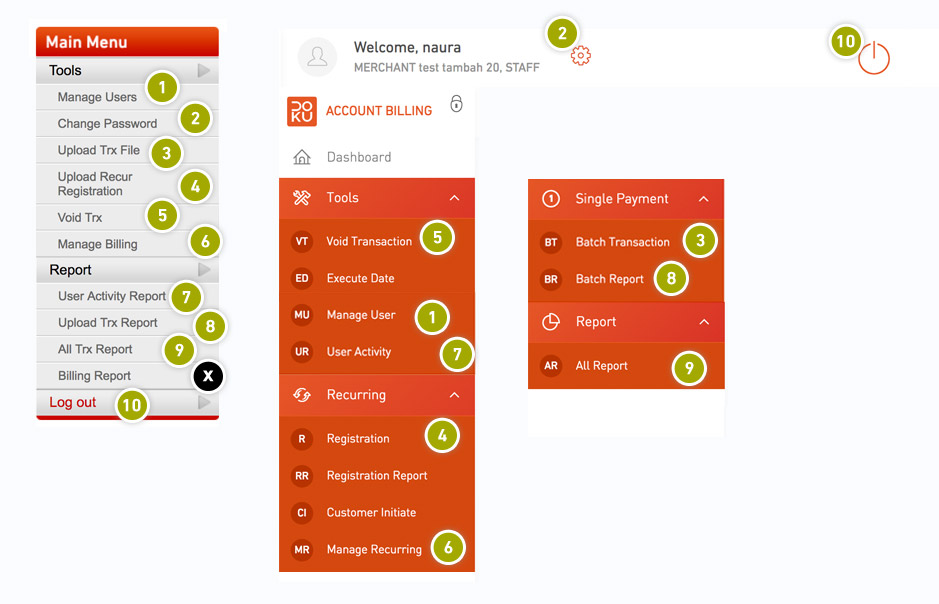
| No | Old Back Office | New Back Office |
|---|---|---|
| 1 | Manage Users | Manage User |
| 2 | Change Password | Icon Setting Account |
| 3 | Upload Trx File | Batch Transaction |
| 4 | Upload Recur Registration | Registration |
| 5 | Void Trx | Void Transaction |
| 6 | Manage Billing | Manage Recurring |
| 7 | User Activity Report | User Activity |
| 8 | Upload Trx Report | Batch Report |
| 9 | All Trx Report | All Report |
| 10 | Log Out | Icon Log Out |
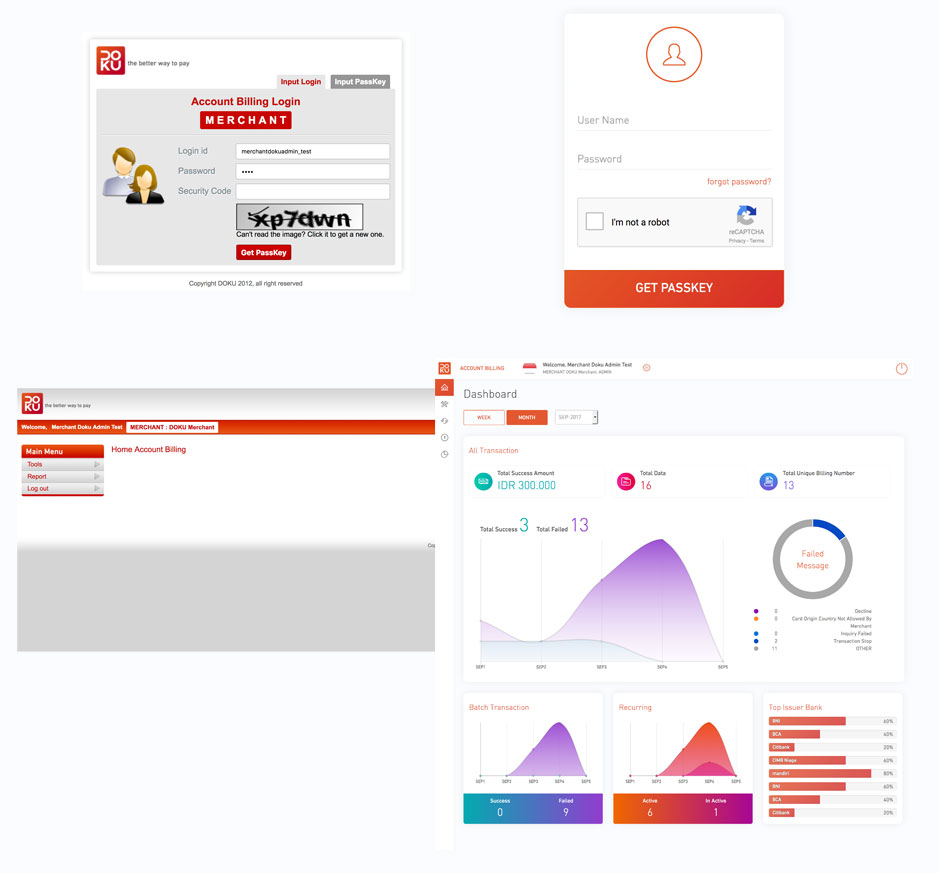
Login
For login you need user name, password and secret key ( Google Authenticator ), follow step by step instruction login like description below.
- Admin Create New User for you
- Check your email
- Download Google Authenticator
- Follow First Verivication
- Follow Second Verivication
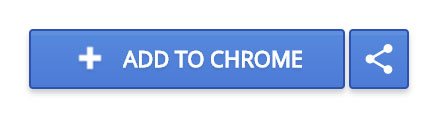
Google Authenticator
You can download Google Authenticator in Play Store, Apps Store or Chrome Apps by click image below.


- Open Chrome Browser
-
Download apps

-
Click button ADD TO CHROME
-
Click button Add Extention

-
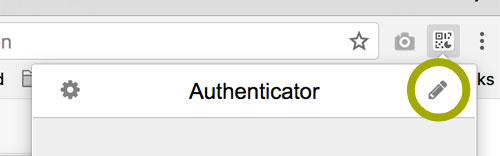
After success install you will have icon in top right you chrome browser

- Copy secret key that you had in email
-
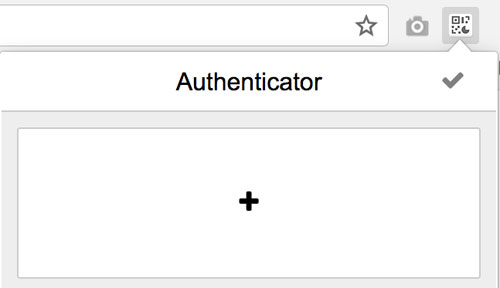
Click Authenticator icon and click Edit Icon to add Authenticator key
-
Click + button
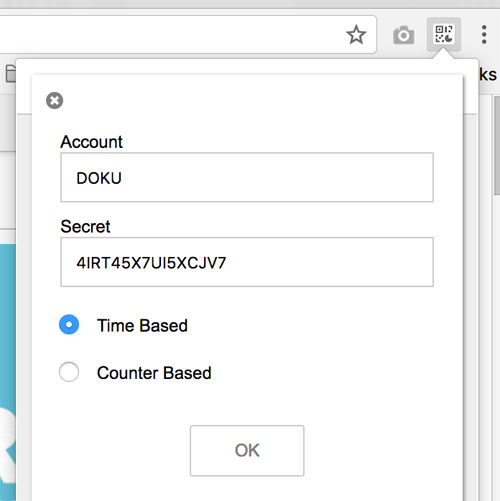
- Choose Manual Entry
-
Input Account whatever you like, and copy paste secret key that you had and choose Time Based. Click OK
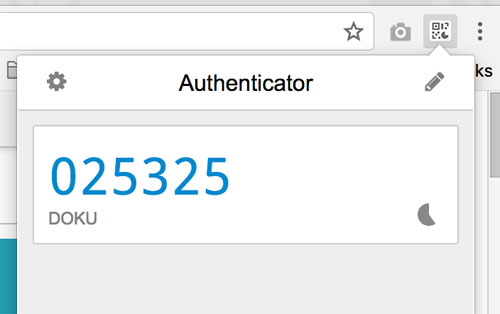
-
Done. You had pass key to Second Verification Login.
First Verivication
-
Input your user name and password
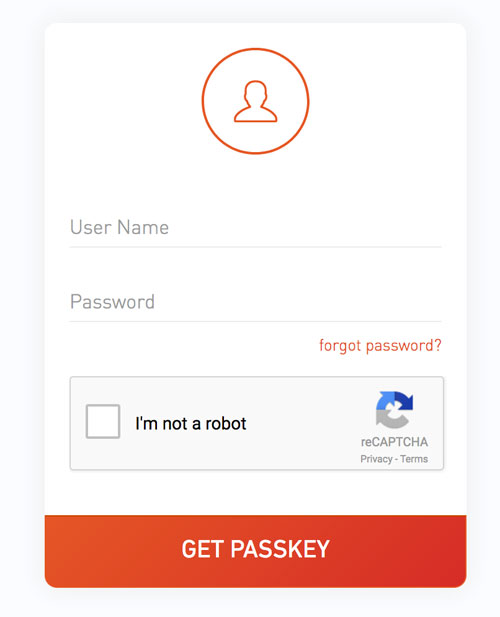
-
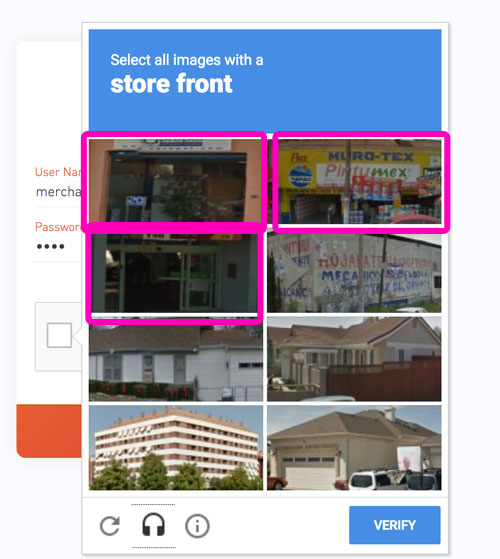
Look what the instruction capcha and click image that right, Click "VERIFY". For example below image with purple border are the correct answer
- Click Button "GET PASSKEY" to Second Verification
Second Verivication
-
Click icon apps Authenticator in chrome browser like image below and click the number
-
Paste in form, and click button "SUBMIT"
- DONE, Welcome to Account Billing Back Office
New User
If you first login you need to change Password First
-
Input your current password and new password, password must alpha numeric min 8 character example ( mypassword1234 )
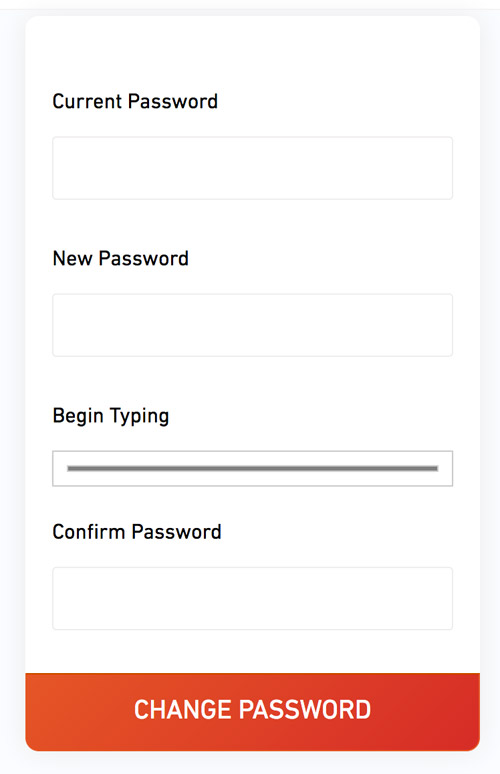
- Login again with new password
-
Input your user name and password
-
Look what the instruction capcha and click image that right, Click "VERIFY". For example below image with purple border are the correct answer
- Click Button "GET PASSKEY" to Second Verification
-
Click icon apps Authenticator in chrome browser like image below and click the number
- Paste in form, and click button "SUBMIT"
- DONE, Welcome to Account Billing Back Office
New User
If you first login you need to change Password First
-
Input your current password and new password, password must alpha numeric min 8 character example ( mypassword1234 )
- Login again with new password
-
Input your current password and new password, password must alpha numeric min 8 character example ( mypassword1234 )
- Login again with new password
Dashboard
In Dashboard you can see report transaction from all transaction activity, you can see the detail from
result transaction failed, success & all others value, explanation like describe below.
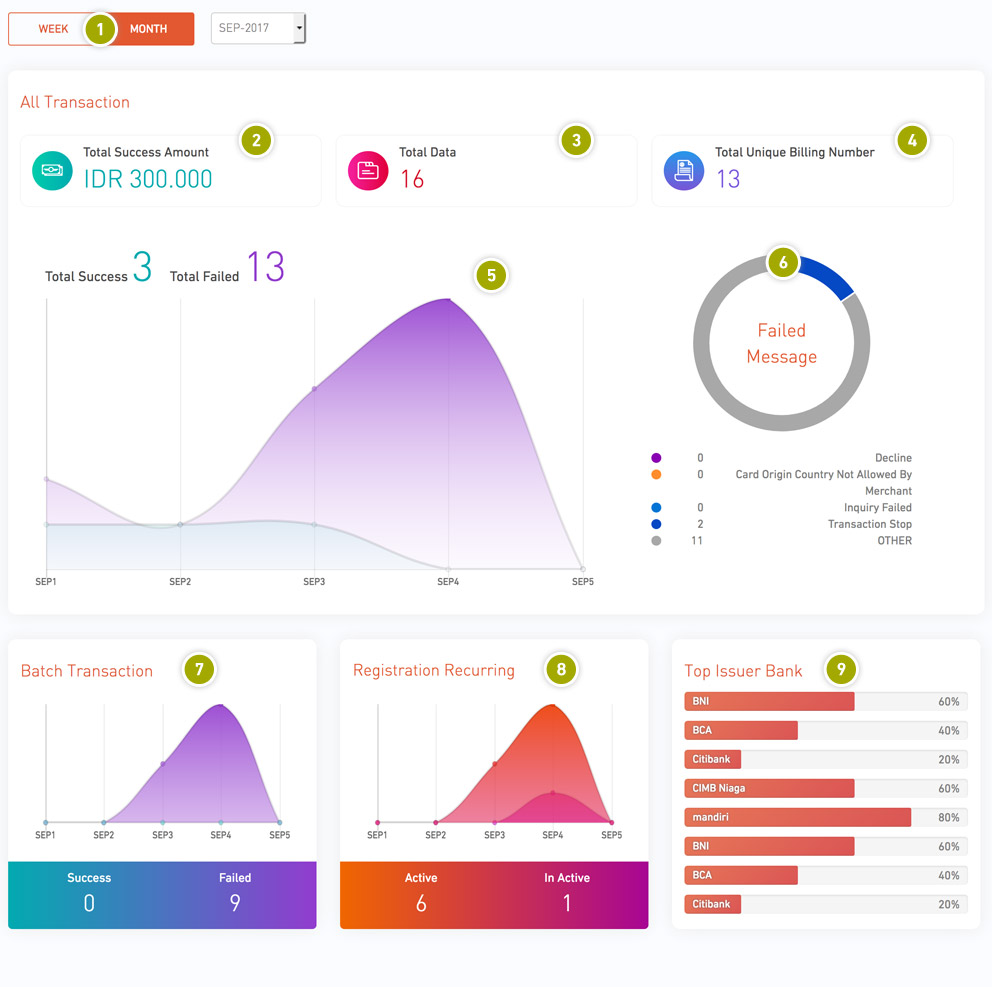
1
Weekly / Monthly
Time based for chart report
2
Total Success Amount
Total amount from all success transaction base on time weekly / Monthly
3
Total Data
Total data transaction base on time weekly / Monthly
4
Total Unique Billing Number
Total Unique Billing from Total Data base on time weekly / Monthly
5
Chart All Transaction
Data success and failed transaction base on time weekly / Monthly
6
Failed Message
Respond from Bank for failed transaction base on time weekly / Monthly
7
Single Payment
Single Payment data success and failed transaction base on time weekly / Monthly
7
Registration Recurring
Data for Registration Recurring and Inactive Recurring base on time weekly / Monthly
8
Top Issuer
List data Issuer Credit Card base on time weekly / Monthly
In Dashboard you can see report transaction from all transaction activity, you can see the detail from result transaction failed, success & all others value, explanation like describe below.
| 1 | Weekly / Monthly | Time based for chart report |
| 2 | Total Success Amount | Total amount from all success transaction base on time weekly / Monthly |
| 3 | Total Data | Total data transaction base on time weekly / Monthly |
| 4 | Total Unique Billing Number | Total Unique Billing from Total Data base on time weekly / Monthly |
| 5 | Chart All Transaction | Data success and failed transaction base on time weekly / Monthly |
| 6 | Failed Message | Respond from Bank for failed transaction base on time weekly / Monthly |
| 7 | Single Payment | Single Payment data success and failed transaction base on time weekly / Monthly |
| 7 | Registration Recurring | Data for Registration Recurring and Inactive Recurring base on time weekly / Monthly |
| 8 | Top Issuer | List data Issuer Credit Card base on time weekly / Monthly |
Tools
Menu Access depending on configuration that admin set
You can Edit / Add User in Manage User to give access login in your Back Office,
Tracking User Activity when using Back Office, and Void transaction.
Manage User
In Manage User menu you can Add New User, Edit User,
Lock User, Reset Password User, and Show Secret Key User.
Explanation each menu describe below
1
Add New User
Add new user to access your Back Office
2
Edit User
Change phone or menu access for user
2
Lock User
Lock user for access your Back Office
2
Reset Passoword
Reset password login user
2
Secret Key
Show Key for second verification user
Add New User
You must field several information to create new user. Like image No 1 Manage User
User Name
User Name for login
Mobile Number
Phone Number User
Email
Email user for sending confirmation email and others
Menu Access
Access user to menu
After you click button "Create User", you will go pop up like image below.
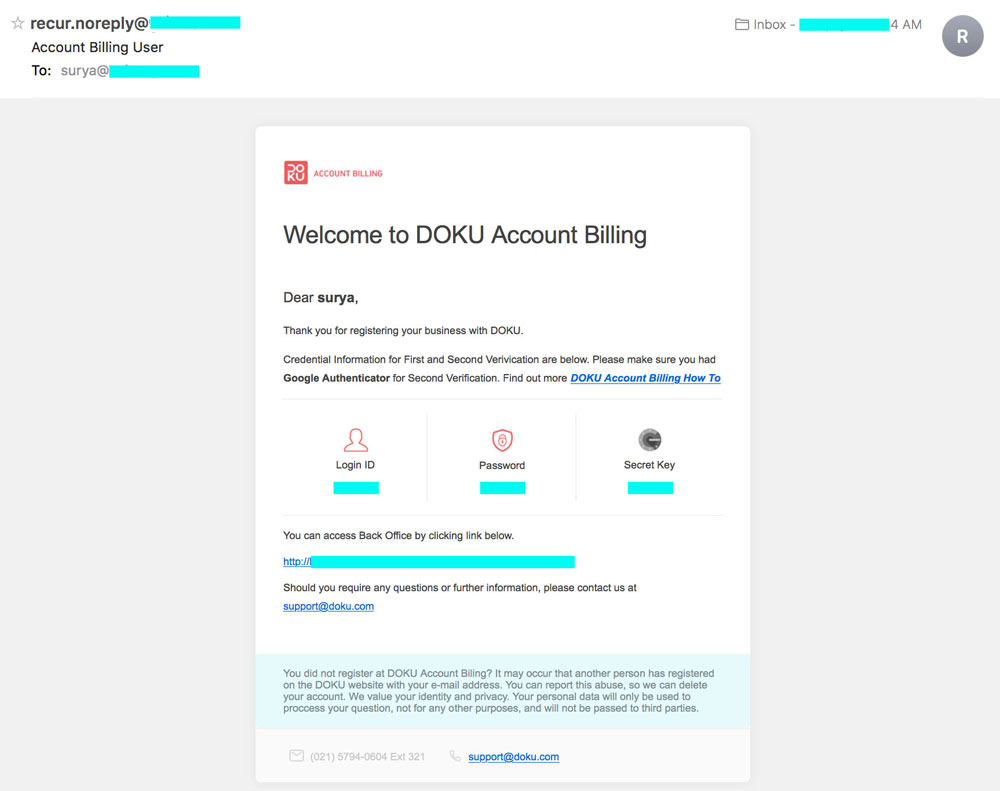
New User will got email from DOKU with credential information like image below.
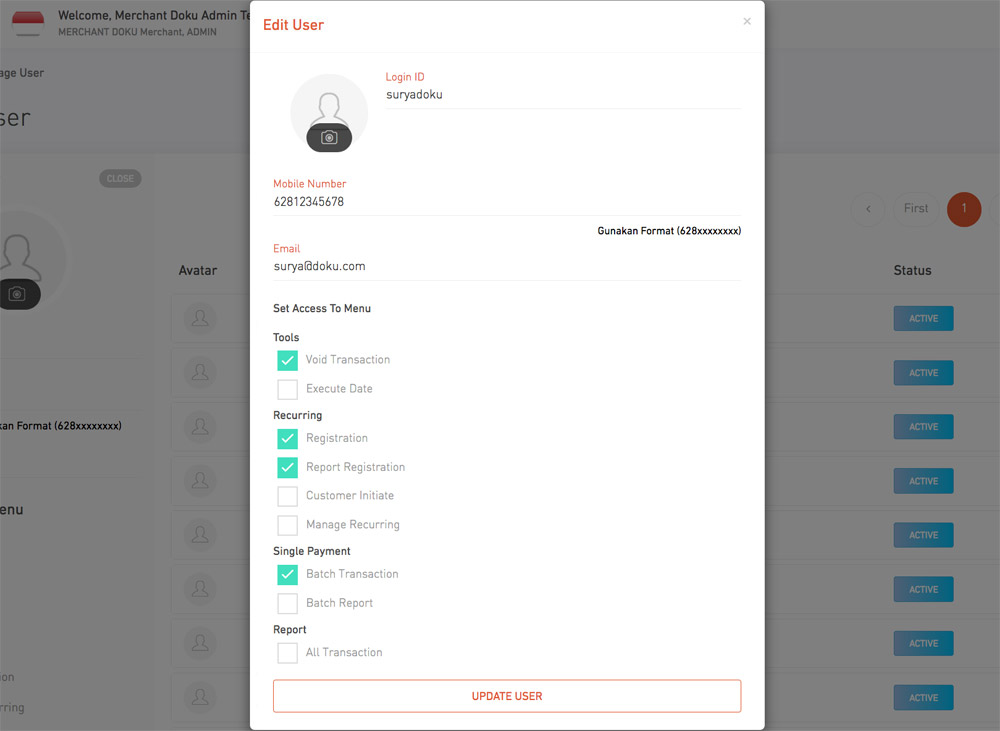
Edit User
You can change only for email, mobile number and menu access user
After click edit, you will got pop up like image below.
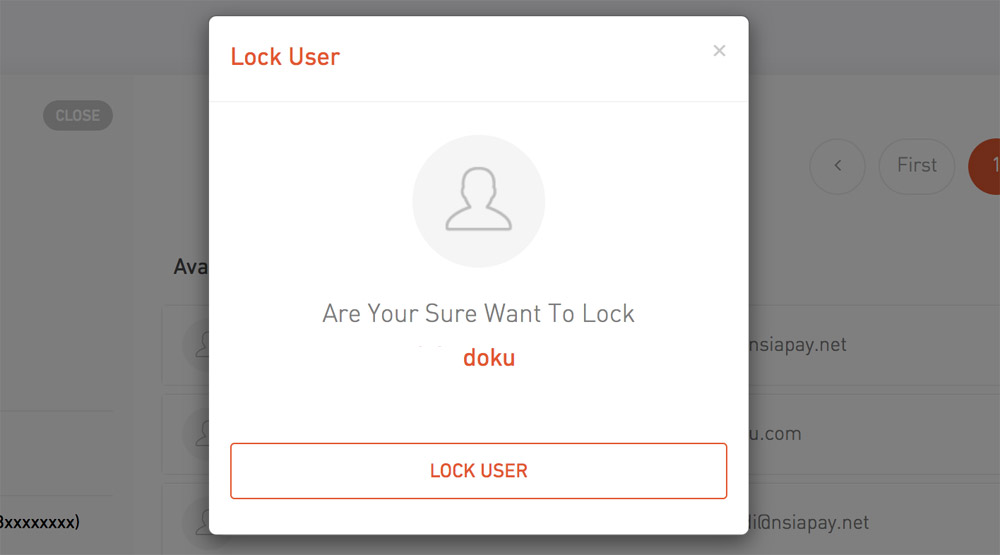
Lock User
This feature for disable user to access Back Office, after you click Lock User you will got pop up like image below.
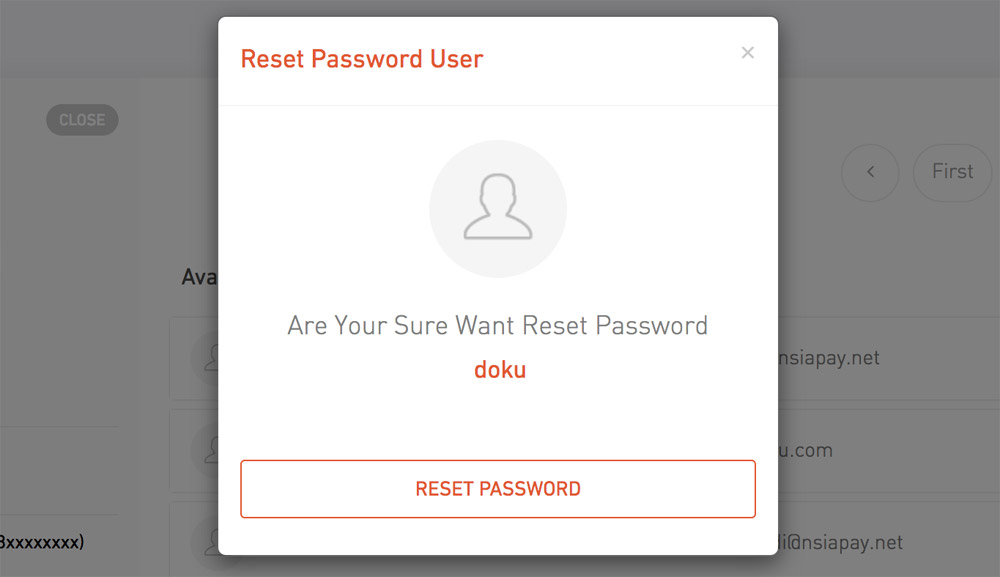
Reset Password
This feature for reset password user if they forgot password, you will got pop up like image below.
New credential information will send to user email.
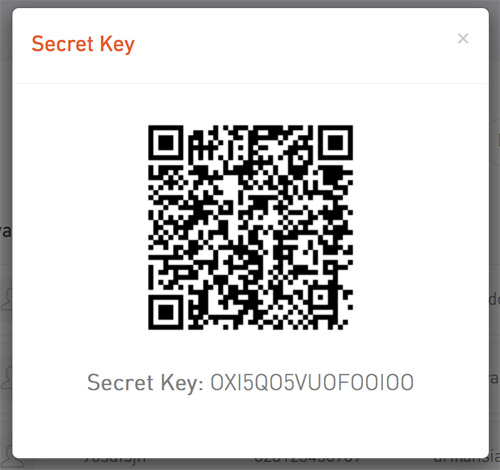
Secret Key
To see secret key second verification for your user.
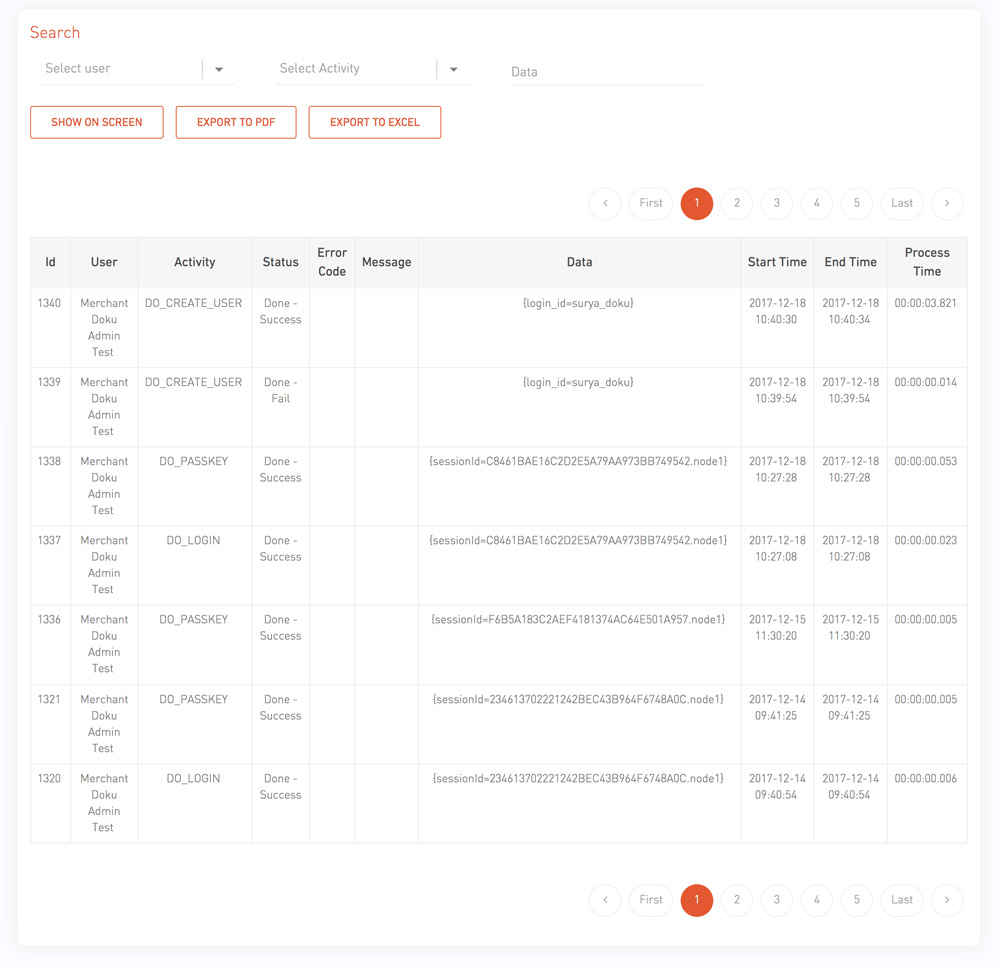
User Activity
You can tracking base on User, Activity or Data.
User
Search by Name User
Activity
Search by Activiy
Data
Search by Invoice Number, Customer ID and others to find out activity that related by that data.
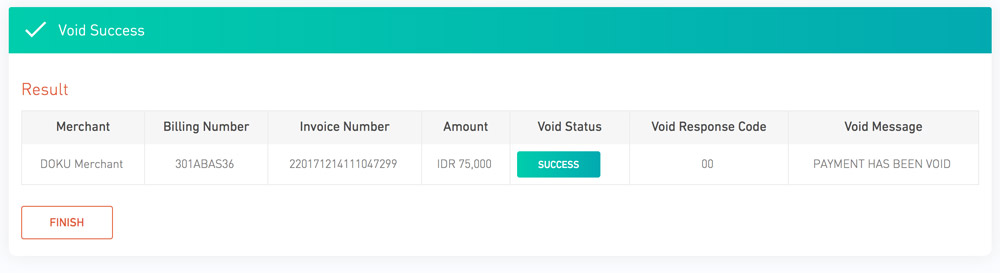
Void Transaction
You can't void if the transaction seetle
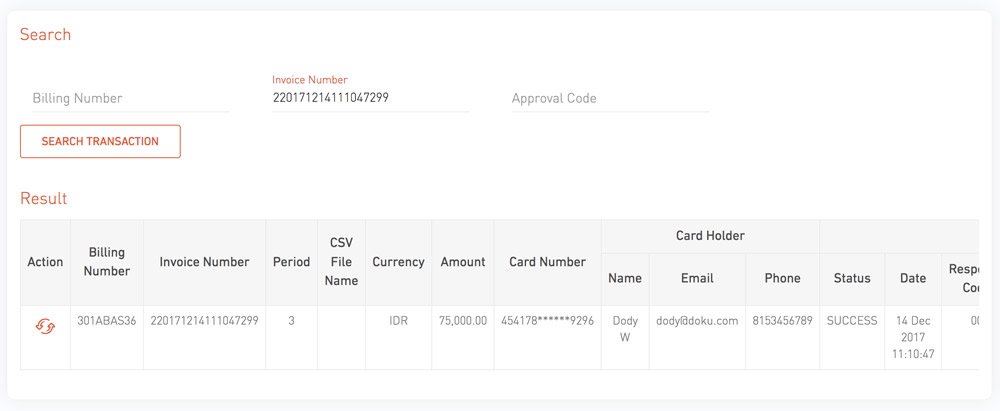
You can search transaction by Billing Number, Invoice Number and Approval Code.
Billing Number
Billing Number Cusomer
Invoice Number
Invoice Number Transaction
Approval Code
Approval Code is unique code from Bank

Result data will appear like image below. Click icon Void in Action Row
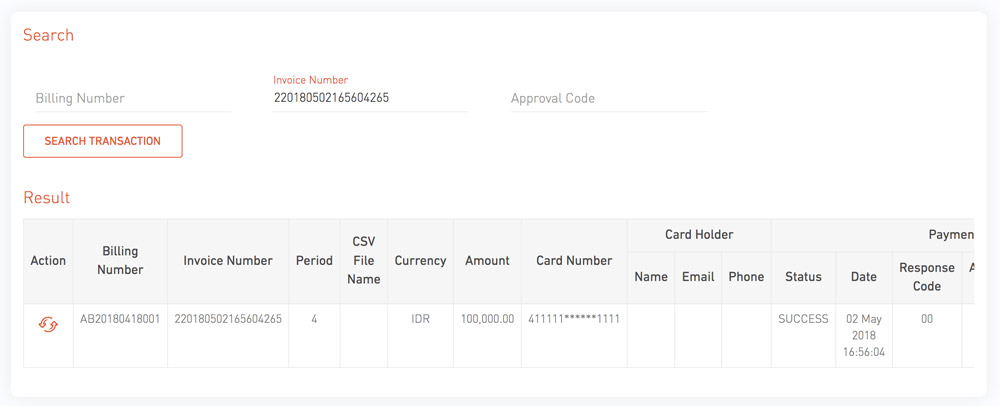
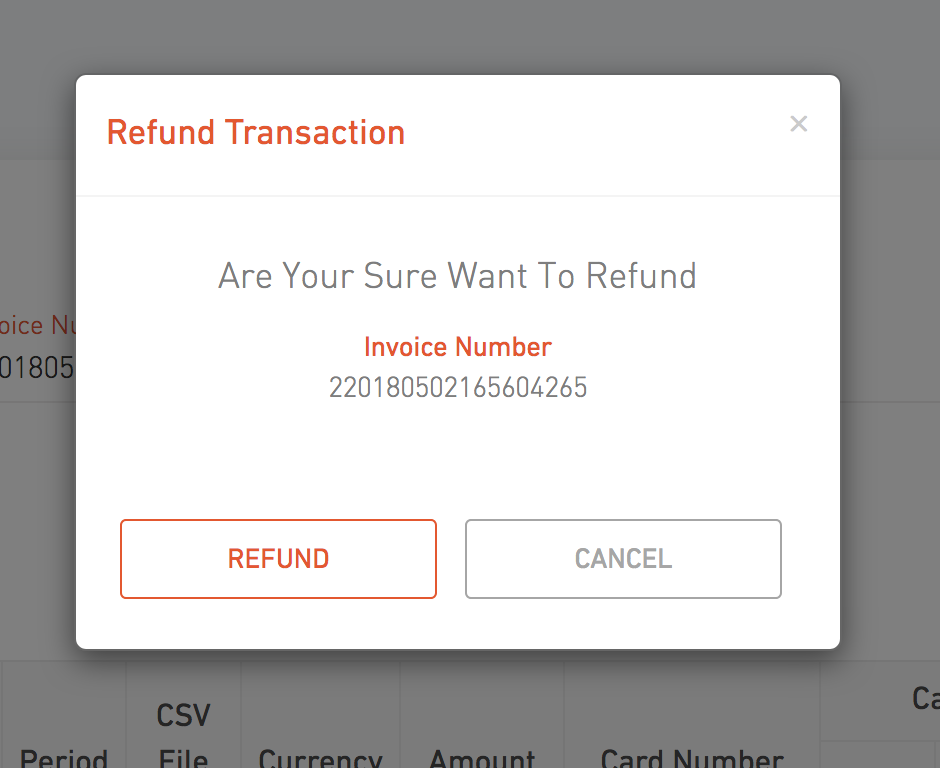
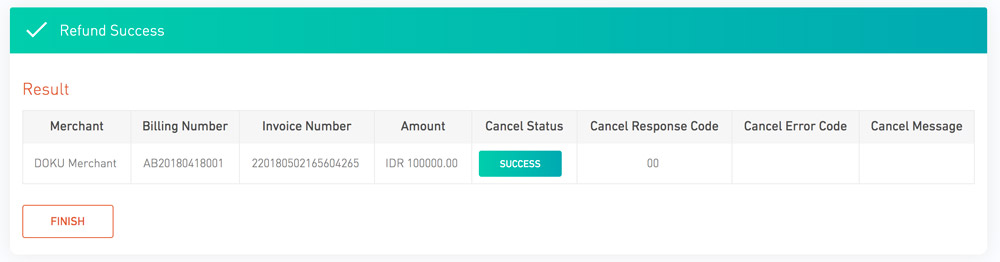
Refund Transaction
Please make sure transaction you want to refund already settle
You can search transaction by Billing Number, Invoice Number and Approval Code.
Billing Number
Billing Number Cusomer
Invoice Number
Invoice Number Transaction
Approval Code
Approval Code is unique code from Bank
Result data will appear like image below. Click icon Refund in Action Row
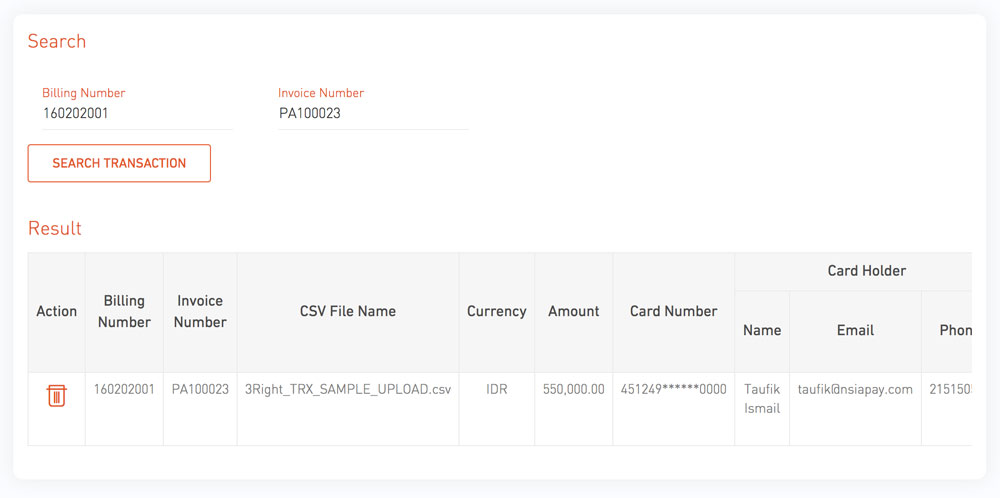
Execute Date
Execute Date Batch Transaction, you can input 3 Execute Date for one transaction, if first execute date
got failed transaction, transaction will run again in second Execute Date.
This feature allow you to selected Execute Date that you want to cancel, input Billing Number and Invoice Number for search transaction.
Billing Number
Billing ID
Invoice Number
Invoice Number Transaction

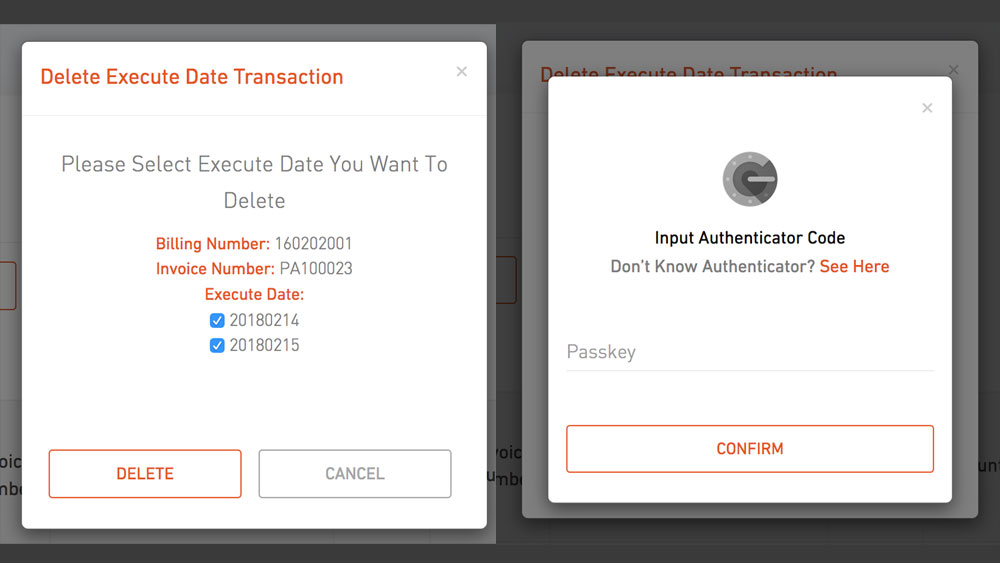
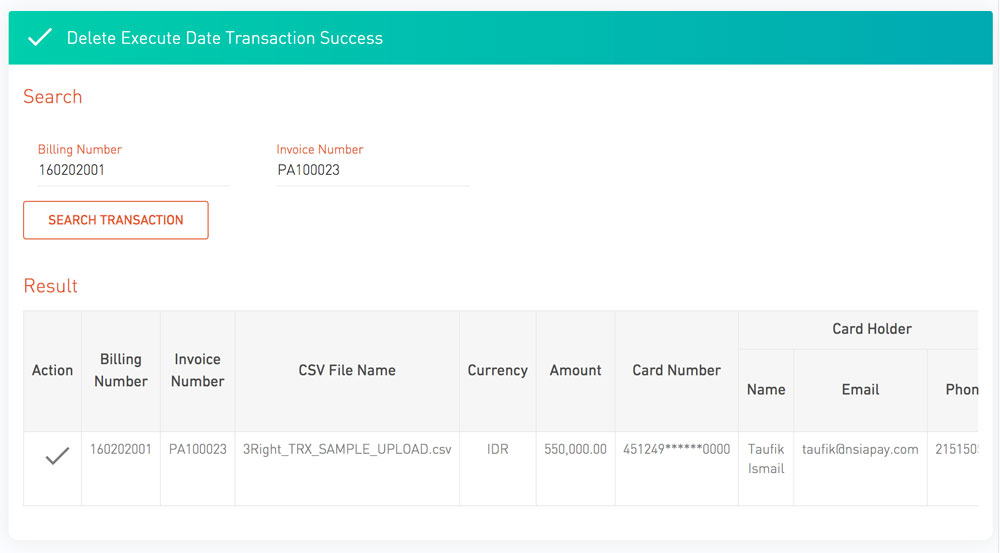
Result data will appear like image below. Click icon Delete in Action Row
Select Execute Date you want to delete and input your authenticator to confirm.
You can Edit / Add User in Manage User to give access login in your Back Office, Tracking User Activity when using Back Office, and Void transaction.
In Manage User menu you can Add New User, Edit User,
Lock User, Reset Password User, and Show Secret Key User.
Explanation each menu describe below
| 1 | Add New User | Add new user to access your Back Office |
| 2 | Edit User | Change phone or menu access for user |
| 2 | Lock User | Lock user for access your Back Office |
| 2 | Reset Passoword | Reset password login user |
| 2 | Secret Key | Show Key for second verification user |
Add New User
You must field several information to create new user. Like image No 1 Manage User
User Name
User Name for login
Mobile Number
Phone Number User
Email
Email user for sending confirmation email and others
Menu Access
Access user to menu
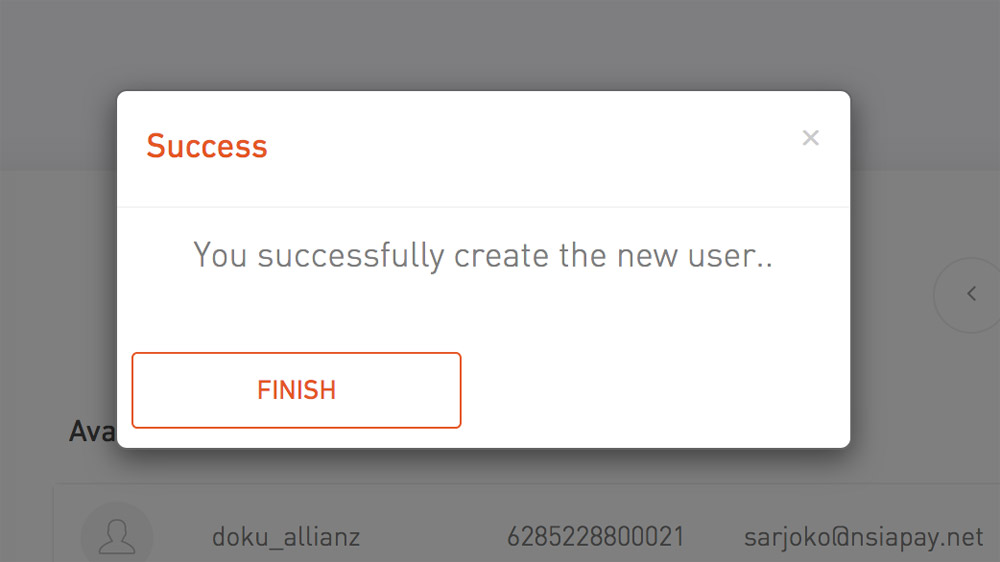
After you click button "Create User", you will go pop up like image below.
New User will got email from DOKU with credential information like image below.
You must field several information to create new user. Like image No 1 Manage User
| User Name | User Name for login |
| Mobile Number | Phone Number User |
| Email user for sending confirmation email and others | |
| Menu Access | Access user to menu |
After you click button "Create User", you will go pop up like image below.
New User will got email from DOKU with credential information like image below.
Edit User
You can change only for email, mobile number and menu access user
After click edit, you will got pop up like image below.
After click edit, you will got pop up like image below.
Lock User
This feature for disable user to access Back Office, after you click Lock User you will got pop up like image below.
This feature for disable user to access Back Office, after you click Lock User you will got pop up like image below.
Reset Password
This feature for reset password user if they forgot password, you will got pop up like image below. New credential information will send to user email.
Secret Key
To see secret key second verification for your user.
User Activity
You can tracking base on User, Activity or Data.
User
Search by Name User
Activity
Search by Activiy
Data
Search by Invoice Number, Customer ID and others to find out activity that related by that data.
Void Transaction
You can't void if the transaction seetle
You can search transaction by Billing Number, Invoice Number and Approval Code.
Billing Number
Billing Number Cusomer
Invoice Number
Invoice Number Transaction
Approval Code
Approval Code is unique code from Bank
Result data will appear like image below. Click icon Void in Action Row
Refund Transaction
Please make sure transaction you want to refund already settle
You can search transaction by Billing Number, Invoice Number and Approval Code.
Billing Number
Billing Number Cusomer
Invoice Number
Invoice Number Transaction
Approval Code
Approval Code is unique code from Bank
Result data will appear like image below. Click icon Refund in Action Row
Execute Date
Execute Date Batch Transaction, you can input 3 Execute Date for one transaction, if first execute date
got failed transaction, transaction will run again in second Execute Date.
This feature allow you to selected Execute Date that you want to cancel, input Billing Number and Invoice Number for search transaction.
Billing Number
Billing ID
Invoice Number
Invoice Number Transaction
Result data will appear like image below. Click icon Delete in Action Row
Select Execute Date you want to delete and input your authenticator to confirm.
You can tracking base on User, Activity or Data.
| User | Search by Name User |
| Activity | Search by Activiy |
| Data | Search by Invoice Number, Customer ID and others to find out activity that related by that data. |
You can search transaction by Billing Number, Invoice Number and Approval Code.
| Billing Number | Billing Number Cusomer |
| Invoice Number | Invoice Number Transaction |
| Approval Code | Approval Code is unique code from Bank |
Result data will appear like image below. Click icon Void in Action Row
Refund Transaction
Please make sure transaction you want to refund already settle
You can search transaction by Billing Number, Invoice Number and Approval Code.
Billing Number
Billing Number Cusomer
Invoice Number
Invoice Number Transaction
Approval Code
Approval Code is unique code from Bank
Result data will appear like image below. Click icon Refund in Action Row
Execute Date
Execute Date Batch Transaction, you can input 3 Execute Date for one transaction, if first execute date
got failed transaction, transaction will run again in second Execute Date.
This feature allow you to selected Execute Date that you want to cancel, input Billing Number and Invoice Number for search transaction.
Billing Number
Billing ID
Invoice Number
Invoice Number Transaction
Result data will appear like image below. Click icon Delete in Action Row
Select Execute Date you want to delete and input your authenticator to confirm.
You can search transaction by Billing Number, Invoice Number and Approval Code.
| Billing Number | Billing Number Cusomer |
| Invoice Number | Invoice Number Transaction |
| Approval Code | Approval Code is unique code from Bank |
Result data will appear like image below. Click icon Refund in Action Row
This feature allow you to selected Execute Date that you want to cancel, input Billing Number and Invoice Number for search transaction.
| Billing Number | Billing ID |
| Invoice Number | Invoice Number Transaction |
Result data will appear like image below. Click icon Delete in Action Row
Select Execute Date you want to delete and input your authenticator to confirm.
Recurring
Recurring is feature payment that will running automaticly base on scheduler that you set ( Day, Date and Full Date )
, you will have full access to change the scheduler base on Customer ID or Billing No. For more information you can see
at Recurring Menu at Back Office.
Registration
Batch Registration feature allow you to register scheduler payment for your existing customer. All scheduler and
payment process will be manage by DOKU.

File Name
Name file that you upload
Total Amount
Total amount for recurring data in file
Total Data
Total data biling in file
Invalid Data
Billing no that got invalid data
Registration Report
List history data that you upload base on file name. Click icon detail to see all data Registration
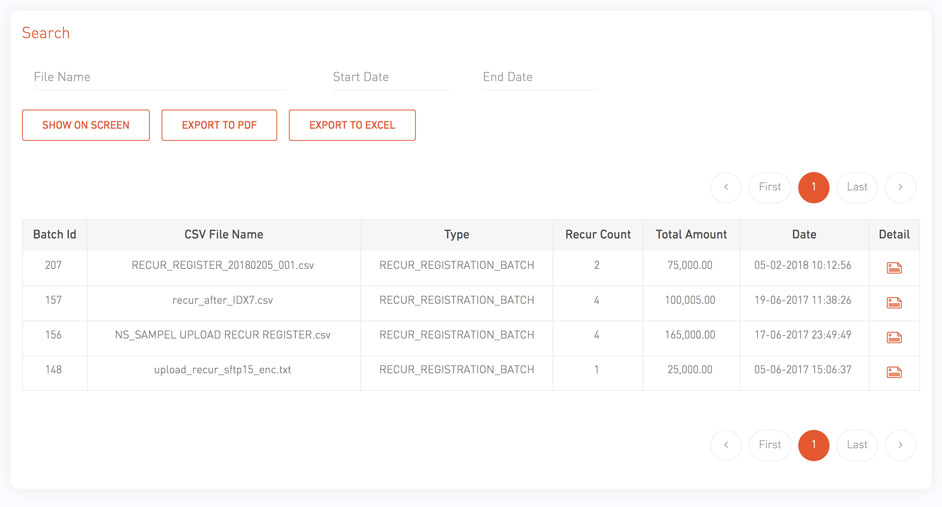

Total Data
Total data registration
Total Amount
Total amount for recurring data in file
Customer Initiate
Customer Initiate is Registration Recurring with DOKU Hosted
You can tracking all data that coming from Registration Recurring with DOKU Hosted
Manage Recurring
All feature changes data in this menu require authentication for confirmation
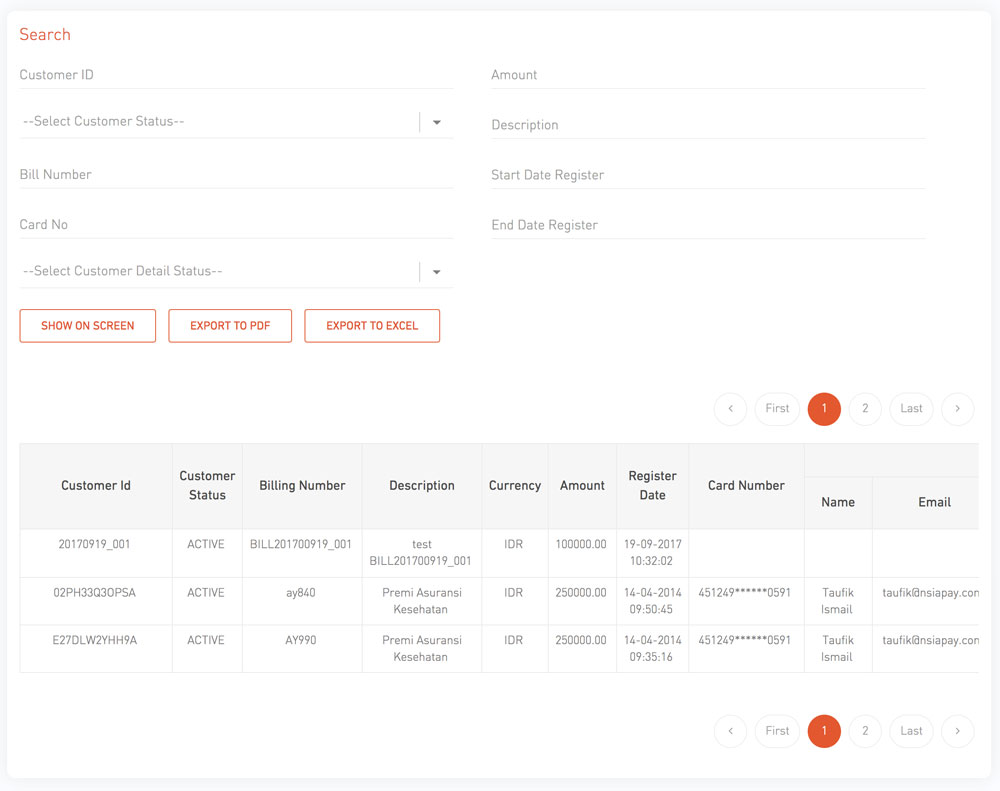
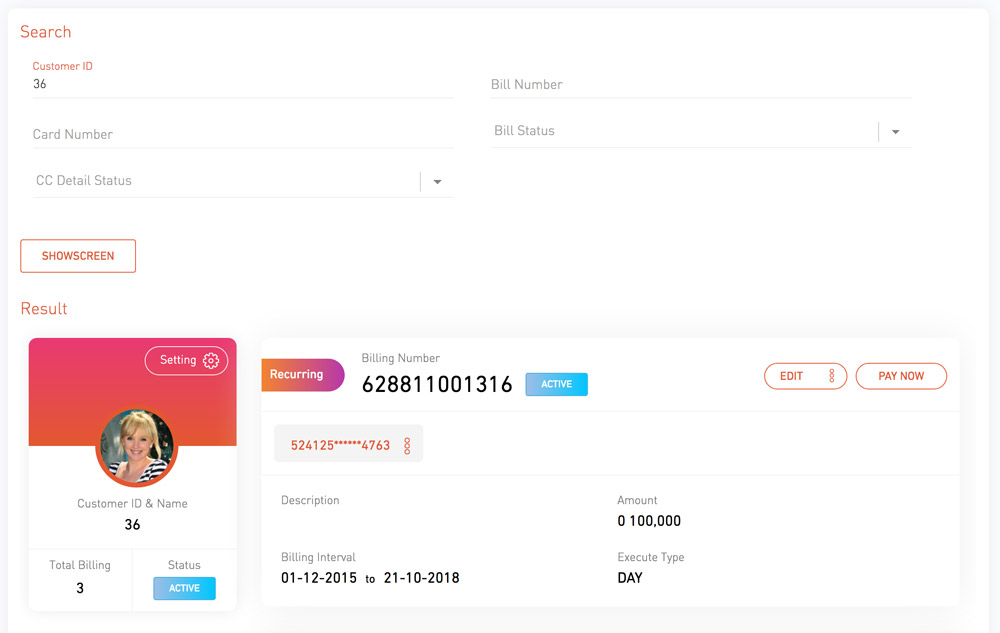
You can search data by Customer ID or Billing Number, the result will be like image below.
Click button edit and you will show drop down menu like image below.
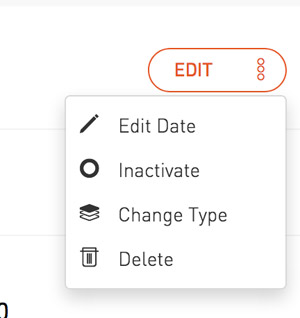
Edit Date
Change billing schedule customer
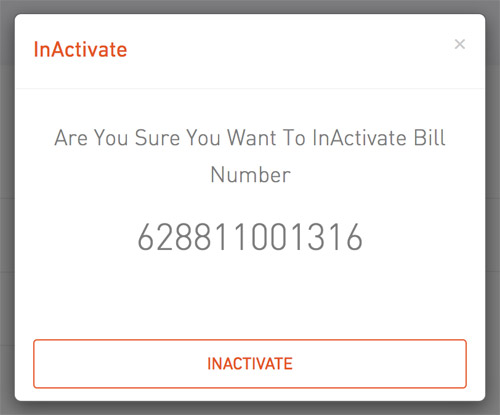
Inactivate
To inactivate billing ( billing schedule will not run )
Change Type
Change type of billing
Delete
Delete Billing
Edit Date
You can edit date for Billing Customer with several type like image below.
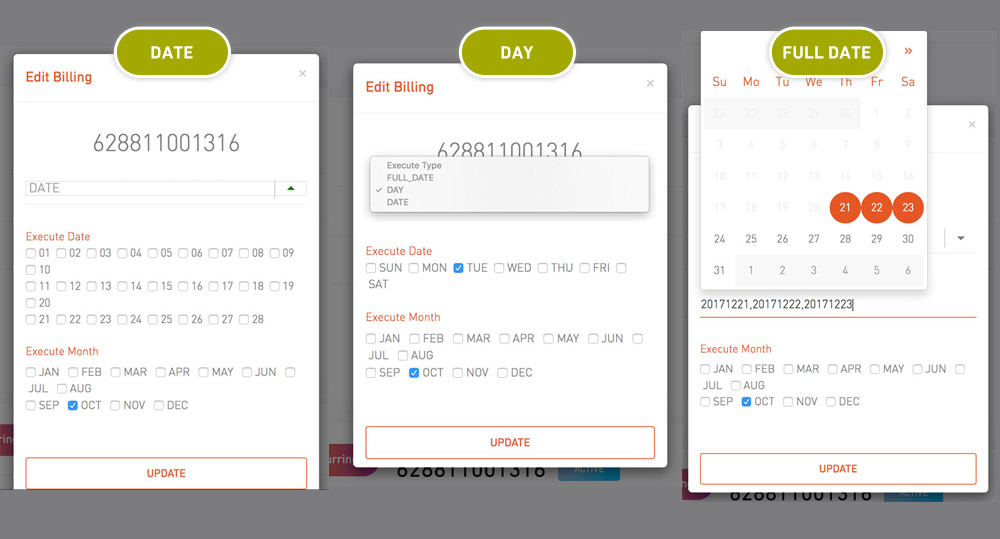
Date
Select execute date 1 - 28 and execute month, recurring run
on base on execute date and month you set.
Day
Select day and month you want recurring run, recurring will run base on
day you select.
Example :
If you set Monday and in December had 5 Moday, Recurring will running 5 Times )
Full Date
You also can select certain date for recurring to run
Inactivate
If you want customer billing still exist but the recurring not run, you can inactivate the billing,
same if you customer want activate again billing button will be "Activate"
Change Type
There are 2 type that you can set to customer billing, explenation below.
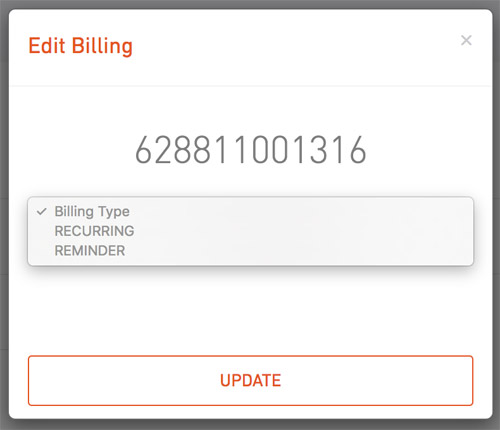
Recurring
Will make scheduler payment base on execute date
Reminder
Only send notification by API so you can remind your user ( No Payment )
Delete Billing
Feature for delete biling from you customer
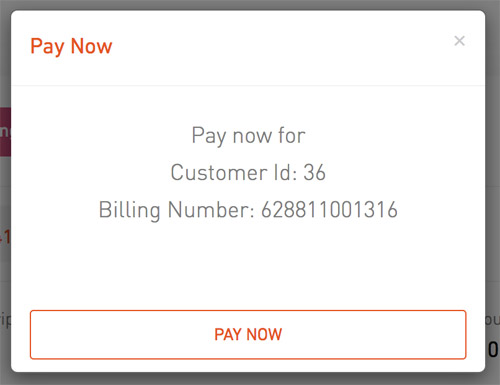
Pay Now
Make sure your aware about "Pay Now", this feature will make payment with same amount as billing amount,
even billing already run.
You can make payment billing without scheduler.
Recurring is feature payment that will running automaticly base on scheduler that you set ( Day, Date and Full Date ) , you will have full access to change the scheduler base on Customer ID or Billing No. For more information you can see at Recurring Menu at Back Office.
Batch Registration feature allow you to register scheduler payment for your existing customer. All scheduler and payment process will be manage by DOKU.
| File Name | Name file that you upload |
| Total Amount | Total amount for recurring data in file |
| Total Data | Total data biling in file |
| Invalid Data | Billing no that got invalid data |
Registration Report
List history data that you upload base on file name. Click icon detail to see all data Registration
Total Data
Total data registration
Total Amount
Total amount for recurring data in file
Customer Initiate
Customer Initiate is Registration Recurring with DOKU Hosted
You can tracking all data that coming from Registration Recurring with DOKU Hosted
Manage Recurring
All feature changes data in this menu require authentication for confirmation
You can search data by Customer ID or Billing Number, the result will be like image below.
Click button edit and you will show drop down menu like image below.
Edit Date
Change billing schedule customer
Inactivate
To inactivate billing ( billing schedule will not run )
Change Type
Change type of billing
Delete
Delete Billing
Edit Date
You can edit date for Billing Customer with several type like image below.
Date
Select execute date 1 - 28 and execute month, recurring run
on base on execute date and month you set.
Day
Select day and month you want recurring run, recurring will run base on
day you select.
Example :
If you set Monday and in December had 5 Moday, Recurring will running 5 Times )
Full Date
You also can select certain date for recurring to run
Inactivate
If you want customer billing still exist but the recurring not run, you can inactivate the billing,
same if you customer want activate again billing button will be "Activate"
Change Type
There are 2 type that you can set to customer billing, explenation below.
Recurring
Will make scheduler payment base on execute date
Reminder
Only send notification by API so you can remind your user ( No Payment )
Delete Billing
Feature for delete biling from you customer
Pay Now
Make sure your aware about "Pay Now", this feature will make payment with same amount as billing amount,
even billing already run.
You can make payment billing without scheduler.
List history data that you upload base on file name. Click icon detail to see all data Registration
| Total Data | Total data registration |
| Total Amount | Total amount for recurring data in file |
You can tracking all data that coming from Registration Recurring with DOKU Hosted
Manage Recurring
All feature changes data in this menu require authentication for confirmation
You can search data by Customer ID or Billing Number, the result will be like image below.
Click button edit and you will show drop down menu like image below.
Edit Date
Change billing schedule customer
Inactivate
To inactivate billing ( billing schedule will not run )
Change Type
Change type of billing
Delete
Delete Billing
Edit Date
You can edit date for Billing Customer with several type like image below.
Date
Select execute date 1 - 28 and execute month, recurring run
on base on execute date and month you set.
Day
Select day and month you want recurring run, recurring will run base on
day you select.
Example :
If you set Monday and in December had 5 Moday, Recurring will running 5 Times )
Full Date
You also can select certain date for recurring to run
Inactivate
If you want customer billing still exist but the recurring not run, you can inactivate the billing,
same if you customer want activate again billing button will be "Activate"
Change Type
There are 2 type that you can set to customer billing, explenation below.
Recurring
Will make scheduler payment base on execute date
Reminder
Only send notification by API so you can remind your user ( No Payment )
Delete Billing
Feature for delete biling from you customer
Pay Now
Make sure your aware about "Pay Now", this feature will make payment with same amount as billing amount,
even billing already run.
You can make payment billing without scheduler.
You can search data by Customer ID or Billing Number, the result will be like image below.
Click button edit and you will show drop down menu like image below.
| Edit Date | Change billing schedule customer |
| Inactivate | To inactivate billing ( billing schedule will not run ) |
| Change Type | Change type of billing |
| Delete | Delete Billing |
Edit Date
You can edit date for Billing Customer with several type like image below.
Date
Select execute date 1 - 28 and execute month, recurring run
on base on execute date and month you set.
Day
Select day and month you want recurring run, recurring will run base on
day you select.
Example :
If you set Monday and in December had 5 Moday, Recurring will running 5 Times )
Full Date
You also can select certain date for recurring to run
You can edit date for Billing Customer with several type like image below.
| Date | Select execute date 1 - 28 and execute month, recurring run on base on execute date and month you set. |
| Day | Select day and month you want recurring run, recurring will run base on
day you select.
Example : If you set Monday and in December had 5 Moday, Recurring will running 5 Times ) |
| Full Date | You also can select certain date for recurring to run |
Inactivate
If you want customer billing still exist but the recurring not run, you can inactivate the billing,
same if you customer want activate again billing button will be "Activate"
If you want customer billing still exist but the recurring not run, you can inactivate the billing, same if you customer want activate again billing button will be "Activate"
Change Type
There are 2 type that you can set to customer billing, explenation below.
Recurring
Will make scheduler payment base on execute date
Reminder
Only send notification by API so you can remind your user ( No Payment )
There are 2 type that you can set to customer billing, explenation below.
| Recurring | Will make scheduler payment base on execute date |
| Reminder | Only send notification by API so you can remind your user ( No Payment ) |
Delete Billing
Feature for delete biling from you customer
Pay Now
Make sure your aware about "Pay Now", this feature will make payment with same amount as billing amount,
even billing already run.
You can make payment billing without scheduler.
You can make payment billing without scheduler.
Single Payment
Single Payment is one time transaction to make payment for you customer ( Without Scheduler ). You can adjust when the deduction running
from row "Execute Date" in template that you upload. For more information you can see
at Recurring Menu at Back Office.
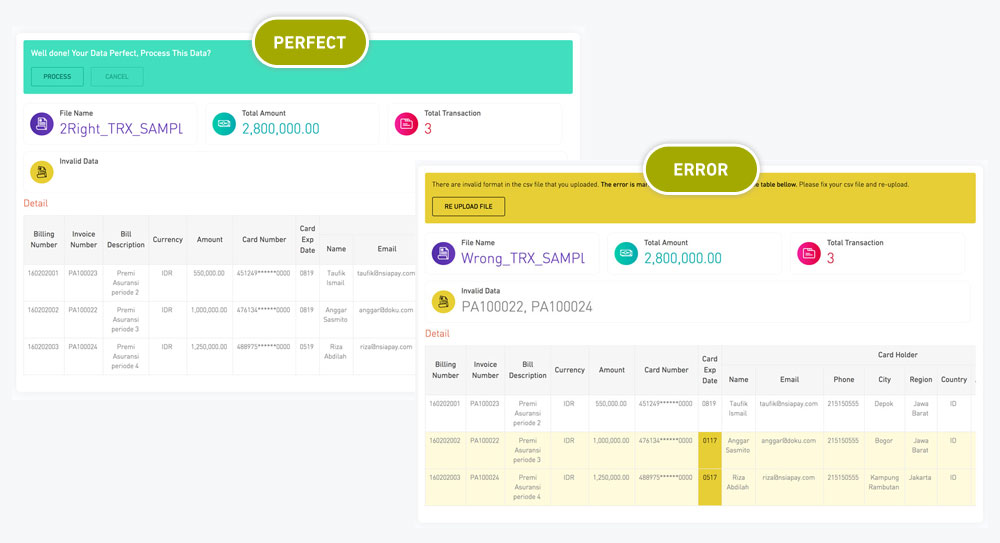
Batch Transaction
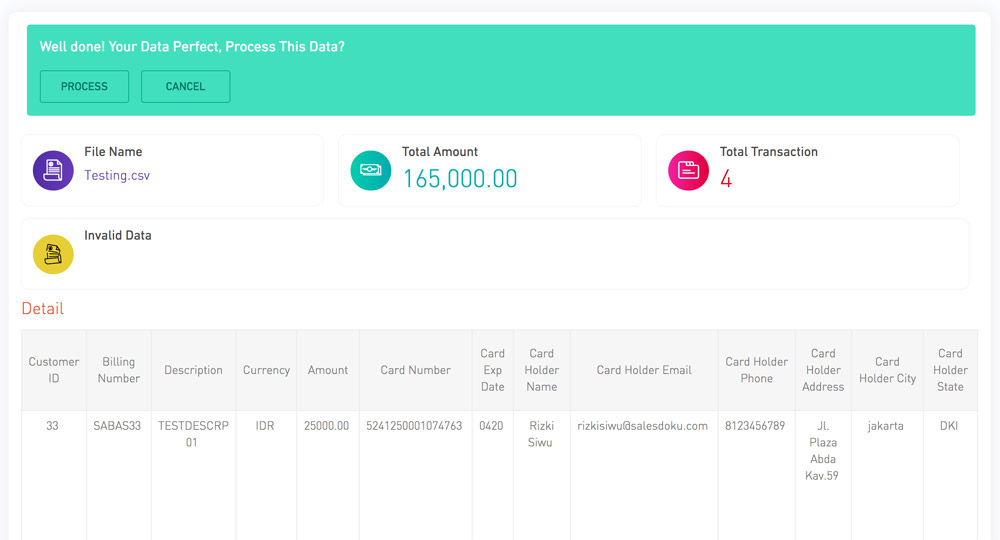
You can drag and drop or browse file to upload data transaction.

If template file that you upload had error data you will notice from background color, like image below. Click
button RE UPLOAD FILE to upload another file. If no warning, you can upload file by click button "Process".
Batch Report
Batch Report list base on the latest you upload, click icon in row Detail for list detail data you batch.
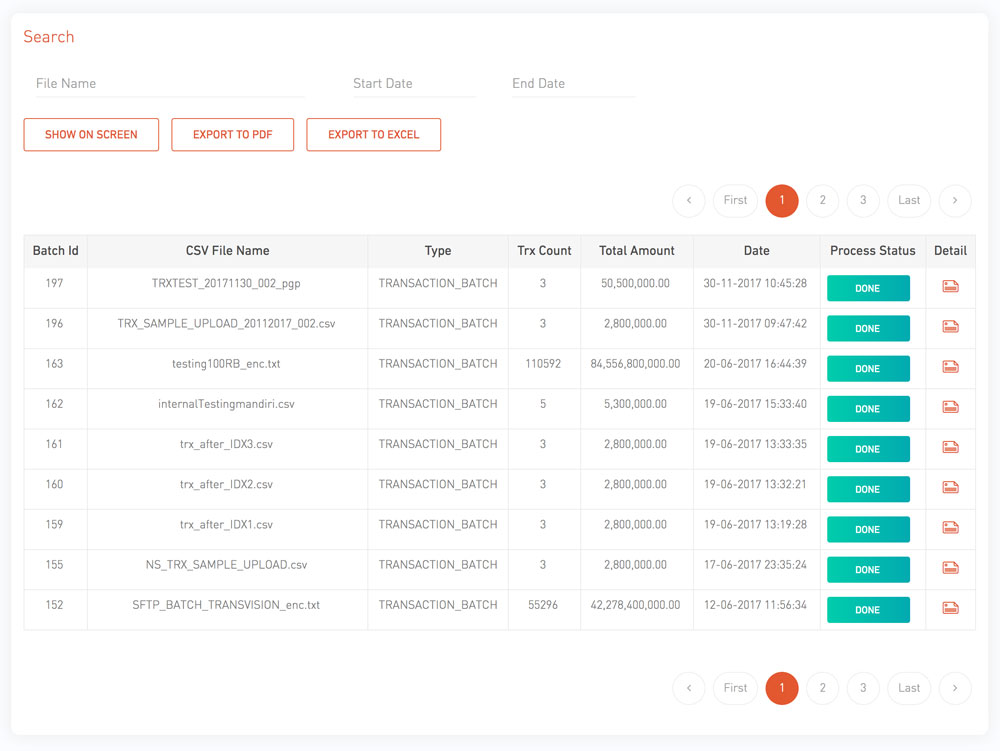
For back to list batch report you can click "Back" in top left.
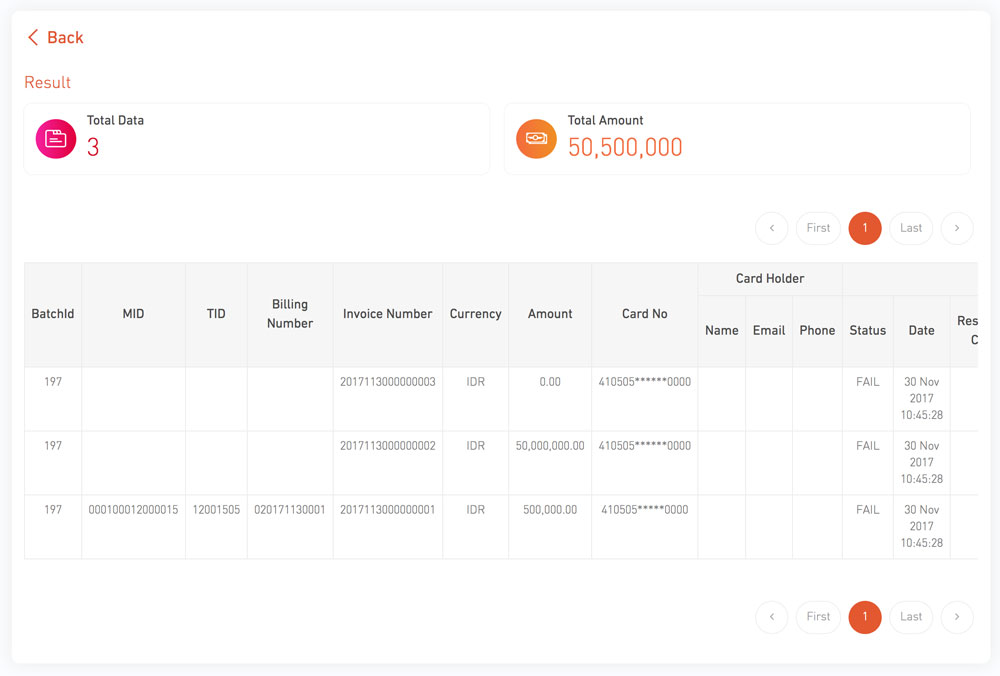
Total Data
Total all data transaction in batch
Total Amount
Total amount transaction in batch
Single Payment is one time transaction to make payment for you customer ( Without Scheduler ). You can adjust when the deduction running from row "Execute Date" in template that you upload. For more information you can see at Recurring Menu at Back Office.
You can drag and drop or browse file to upload data transaction.
If template file that you upload had error data you will notice from background color, like image below. Click button RE UPLOAD FILE to upload another file. If no warning, you can upload file by click button "Process".
Batch Report
Batch Report list base on the latest you upload, click icon in row Detail for list detail data you batch.
For back to list batch report you can click "Back" in top left.
Total Data
Total all data transaction in batch
Total Amount
Total amount transaction in batch
Batch Report list base on the latest you upload, click icon in row Detail for list detail data you batch.
| Total Data | Total all data transaction in batch |
| Total Amount | Total amount transaction in batch |
Report
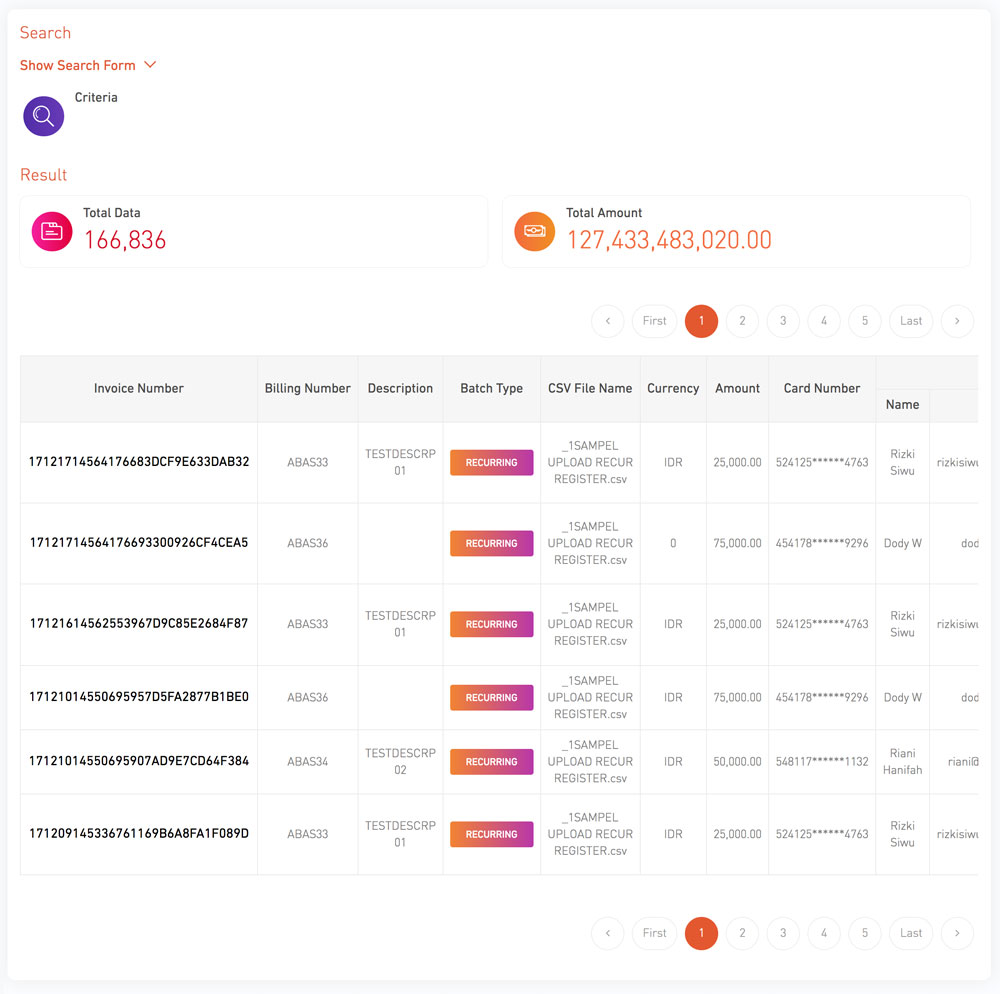
You can search and see detail transaction that you process base on parameter like description below.

Billing Number
Billing Number that you input in template or paramater for payment
Invoice Number
Invoice Number that you input in template or paramater for payment
CSV File Name
Name file that you upload
Amount
Amount that you input in template or paramater for payment
Card No
Card Number Customer that you input in template or paramater for payment
Card Holder Name
Card Holder Name of Credit Card that you input in template or paramater for payment
Card Holder Phone
Card Phone Number of Credit Card that you input in template or paramater for payment
Start Date
Start date search
End Date
End date search
All Batch Type
Select type batch that you want search or you can leave as if for
search in All Batch Type.
- Recurring
- Single Payment
Payment Status
Status payment you want to search
- On Process ( Transaction still pending because several thing like, "Execute Date not equal today" )
- Success ( Transaction succes from acquiring )
- Fail ( Transaction fail from acquiring )
- Reversal ( - )
- Void ( - )
- Refund ( Transaction refund from acquiring )
Payment Respond Code
Uniq code from acquiring for each result transaction
Payment Approval Code
Uniq code from acquiring for success transaction
Payment Error Code
-
Result transaction will like image bellow, if you want to search another parameter you can click
text Show Search Form below title Search.
Criteria
Parameter you input / select to search
Total Data
Total all data transaction base on parameter you search
Total Amount
Total amount transaction base on parameter you search
You can search and see detail transaction that you process base on parameter like description below.
| Billing Number | Billing Number that you input in template or paramater for payment |
| Invoice Number | Invoice Number that you input in template or paramater for payment |
| CSV File Name | Name file that you upload |
| Amount | Amount that you input in template or paramater for payment |
| Card No | Card Number Customer that you input in template or paramater for payment |
| Card Holder Name | Card Holder Name of Credit Card that you input in template or paramater for payment |
| Card Holder Phone | Card Phone Number of Credit Card that you input in template or paramater for payment |
| Start Date | Start date search |
| End Date | End date search |
| All Batch Type |
Select type batch that you want search or you can leave as if for
search in All Batch Type.
|
| Payment Status |
Status payment you want to search
|
| Payment Respond Code | Uniq code from acquiring for each result transaction |
| Payment Approval Code | Uniq code from acquiring for success transaction |
| Payment Error Code | - |
Result transaction will like image bellow, if you want to search another parameter you can click text Show Search Form below title Search.
| Criteria | Parameter you input / select to search |
| Total Data | Total all data transaction base on parameter you search |
| Total Amount | Total amount transaction base on parameter you search |
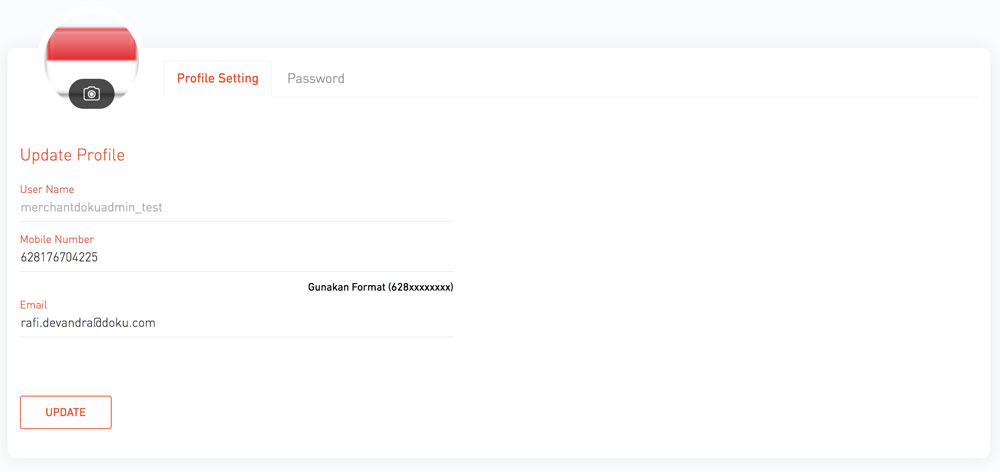
User Setting
You can change your information and password, make sure all the information is real because will for forgot password, change email, etc.
Profile
You can't edit "User Name"
Change Password
